Bonsai Trees
Repotting and Root Pruning
It is necessary to repot bonsai trees to ensure that they remain healthy and continue to grow well. Well developed fibrous roots are essential for balanced, even growth and these are produced by root pruning.
With a compact root system, full of fine, fibrous roots, the bonsai will be able to take up the nutrients which are essential for its well being. It is a misconception that root pruning is responsible for the dwarfing of bonsai trees, as this is achieved by branch pruning techniques.
The frequency that a bonsai needs to be repotted depends on species, age, size and how well the tree has been growing.
Trees that are either young, vigorous or very small are normally repotted every year. Older, established bonsai may only need to be repotted once in five years, or longer. Also, deciduous trees require repotting more frequently than conifers. If you are unsure whether your bonsai requires root pruning, carefully remove the tree from its the pot (when dormant) and examine the roots to see if it is pot bound. The ideal time of the year for root pruning and repotting is late winter and early spring, just before or as soon as buds start to swell.
1. First, if necessary, take time to trim the tree, tidying up any long and unwanted growth. Before repotting, it is wise to have kept the tree under cover for several weeks so that the soil is fairly dry. It is much easier and more pleasant for both you and the bonsai to repot when the soil is not soggy!
Bonsai trees are normally secured in the pot by wire, and if this is the case, the wire should be cut from underneath the pot. With a pot that curves inwards it may be necessary to use a sharp knife to cut around the edge of the root ball. This will enable the tree to be easily removed from the pot.
2. If the tree has started to become pot bound, with long roots growing around the edges of the pot, then it is time for repotting. Try to avoid allowing trees to remain pot bound for several years. This can severely weaken the tree, as its capability to obtain nutrients will be reduced and water will find it difficult to penetrate the soil.
If there is still space for the roots to grow, carefully return the tree to its pot and examine again next year.
3. Remove the surface of the soil with a scrubbing brush - nylon bristled brushes are ideal for this. Brush firmly, radiating outwards from the trunk, but take care not to damage the roots. This simple action can improve the arrangement of the surface roots and excellent results can be achieved over a period of a few years. Convincing and interesting surface roots are highly desirable as they make the bonsai look more stable, realistic and natural.
4. Use an old toothbrush to remove soil and moss from areas close to the trunk. Spend time carefully exposing surface roots. You may notice a root that is ugly and unnecessary and this should be removed, providing that there are sufficient roots nearby to support that area of the tree. Reposition roots where necessary, using wire pegs to hold them in place. When carrying out the repotting procedure a large tray is useful to prevent the surrounding area becoming untidy.
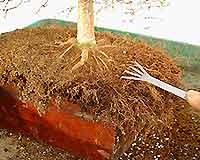
5. To prepare the roots for pruning, use a bonsai fork to comb all soil and grit from the outermost roots. Standing the tree on a box or an upturned pot can make this process easier.
Comb out roots from underneath the mass, after first removing any old mesh or wire. The result should be that the roots will now hang freely, ready for pruning.
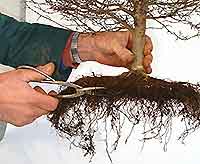
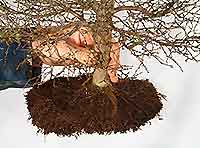
6. Sharp scissors are essential so that the roots are cut cleanly and not squashed. Prune about one third of the roots and certainly no more than one half.
7. Cut several small wedges around the root base where possible. This enables fresh soil to be introduced into the heart of the root ball, helping to keep it healthy.
8. After first cleaning the pot, cover the drainage holes with plastic mesh and secure with wire loops. Prepare long wires for securing the tree and thread these through suitable holes in the bottom of the pot. Add a layer of grit for drainage at the bottom of the pot - the amount to use will vary depending on the depth of the pot.
9. The standard bonsai mix that I prefer consists of equal parts grit, Japanese Akadama clay and a peat based compost. A large sieve should be used to remove any lumps in the peat and a finer sieve is used for the Akadama, which contains a certain amount of undesirable dust. If the tree is growing well and in good health, add a small amount of slow release fertiliser granules to the mix. These will gradually release nutrients into the soil for about six months, as the temperature begins to rise and should be used in addition to other feeds applied during the growing season.
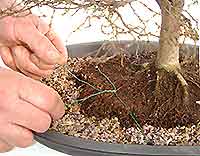
10. Take time positioning the tree in the pot - any mistake at this stage will have to wait until next year to be rectified! Secure with the wire ties so that the tree sits firmly in the pot. Movement whilst the new roots develop can be very damaging and strong winds can blow a bonsai tree out of its pot when it is newly repotted.
11. Use a chopstick to push the soil into awkward places, ensuring that no air pockets are present. Tapping the pot also helps.
Top dress with Japanese Akadama clay. This has the advantage of being both attractive and also a useful dryness indicator, changing to a much lighter colour as the soil begins to dry out.
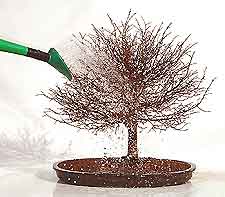
12. Finally thoroughly water the tree and position out of the wind. Protect from hard frosts and wait for the buds to open!
