Bonsai Trees
Case Histories
Scots Pine - (pinus sylvestris)
Scots Pine Bonsai Style: Literati
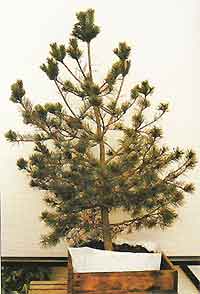
Asked by a local bonsai society to carry out a styling demonstration for a forthcoming meeting, I decided to select some material that would be readily available to most members and so set off for my local garden centre. With no fixed ideas for raw material I was determined to purchase a tree of some kind that day.
The conifer section was stocked with a good choice of Scots pines. They were all quite large and bushy, but one in particular caught my eye. It was growing in a large plastic bag and had more branches than the others. This was to be my demonstration tree!
Several months later the meeting arrived and I had already studied the tree, planning the style and shape that I wanted to create. I chose to emulate a natural pine tree in the literati style, with a long trunk and foliage near the top.
At that time I had no literati style trees in my collection and thought that this tree could be my first. Prior to the meeting I had looked at many pictures of such trees in bonsai books and also gazed up at large specimens growing in the wild.
Scots Pine Bonsai History: Training
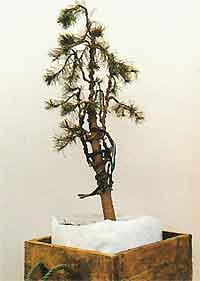
As my demonstration began I explained my thought process and started by removing all branches that were definitely not required, so that I could see more clearly what remained. Having a good mental picture of the end result, I enjoyed the gasps in the audience as the large branches were pruned off! I left potential jins in many places as I thought they could always be trimmed off afterwards.
With much unnecessary clutter removed, I thinned out the end growth on each branch, cutting out the strong central shoot on each group of three to balance the growth and promote budding. The top of the tree was rather leggy and needed shortening. With so many suitable branches available, a new leader was easily selected and the overall height was reduced considerably. Every branch was then wired and I avoided trapping needles where possible.
At this stage I had not shaped anything and the tree was now ready for branch placement, which for me is the most enjoyable part of styling. I began moving the main branches upwards, treating them as separate trunks high up in the tree, the way that Scots pine trees so often grow in nature. After arranging the secondary branches, the initial styling was complete. Although the tree was a long way from being a bonsai tree, the future shape had been outlined and the demonstration was well received and appreciated.
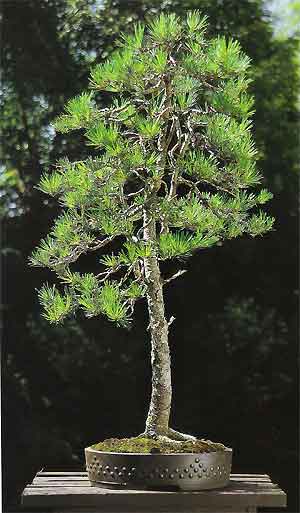
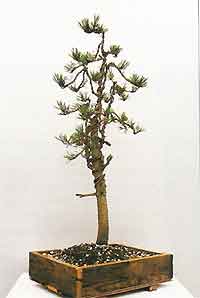
In the spring I removed the tree from the bag and teased out the thick roots, making the root system more shallow. After some minor root pruning the tree was planted into a wooden training box that I had constructed. To help the tree recover and gain strength I allowed the new candles to grow and extend into shoots, lightly trimming them in mid summer. After staying in the box a further year, the tree was then planted into my favourite type of bonsai pot - a round drum style. This shape pot is ideal for a tall, thin literati style, helping the bonsai image unfold and greatly enhancing the pine's image.
By minimal feeding and careful watering during the last three years, the needle size has become smaller and more in scale with the rest of the tree. I am careful not to starve this tree though, as there is a fine line between tiny unhealthy needles and those of a perfect medium size! Being such a natural shape, this bonsai is now a miniature replica of several wild trees from which I drew inspiration.
